Monitors and Agents in UVM
In earlier sections, we learned how a UVM test instantiates UVM Environment and starts stimulus in form of sequence which is nothing but a set of transactions. We also learned how sequencer takes these transactions and puts them on driver which converts these abstract transactions into pin wiggles to drive them to DUT. In this section, we will learn agents which contain sequencer, monitor and a driver. And, we will also learn about a UVM monitor. So, this section focuses on Monitors and Agents in UVM.
Lets look at monitor first:
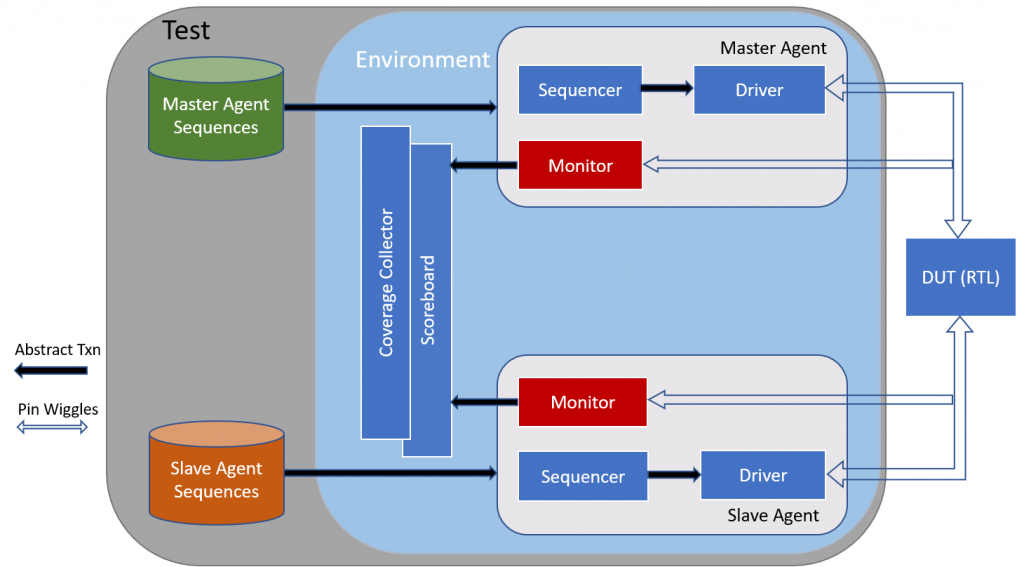
UVM monitor: A monitor converts Pin Wiggles to Abstract transactions. It watches(snoops) pin activity of Design Under Test and converts it to transactions. A monitor is passive component, it does not drive any pins. Furthermore, depending on the project requirement and based on test bench architecture requirement, a Verification Engineer can either have Driver send input transactions to Scoreboard and Coverage Collector OR a monitor can snoop the DUT input pins, convert them into abstract transactions and send it to Scoreboard and Coverage Collector. We will need monitor to snoop pin activity at outputs of DUT as well. This will be the actual data which is snooped by monitor, converted to abstract transactions and sent to Scoreboard which compares it with the input transactions. Regarding, snooping input data, one should always choose to have a monitor snoop the input pins of DUT as it will eliminate possible Design to Testbench race conditions. So, a good practice would be to have a monitor at input of DUT to calculate expected data and one at output pins of DUT to get actual data and have both these monitors send abstract transactions to Scoreboard. Below is the diagram that shows how monitors can be viewed as part of overall UVM testbench architecture.
Here is a sample code for a monitor that snoops output pin “result” of the DUT. Let’s look at this sample code first before we get to the line by line explanation of it.
class add_monitor extends uvm_monitor;
`uvm_component_utils(add_monitor)
uvm_analysis_port(#packet_c) mon_ap;
function new(string name=””, uvm_component parent);
super.new(name,parent);
mon_ap = new(“mon_ap”, this);
endfunction
function build(string name=””, uvm_component parent);
super.build(name,parent);
uvm_config_db #(virtual tb_intf)::get(this,””,”vif”,vif);
endfunction
task run();
fork
collect_txn();
join
endtask
task collect_txn()
forever@(posedge cb.vif.clk) begin
packet_c txn;
txn = packet_c::type_id::create(“packet_c”, this);
// txn.a = vif.cb.a;
// txn.b = vif.cb.b;
txn.result = vif.cb.result;
mon_ap.write(txn);
end
endtask
endclass
In above code, a class called add_monitor is created by extending it from standard UVM base class uvm_monitor. The class is then registered in factory using macro `uvm_component_utils and passing the name of the class as argument into the macro. After that, an analysis port mon_ap is declared. Since analysis port is parameterized, we pass packet_c so that this port knows it is supposed to handle packet_c type of transactions. Now, similar to earlier uvm components that we learned, let’s define a new constructor and a build function. Inside build function, we get access to virtual interface pointer “vif” from config database using uvm_config_db::get() function. If you remember we did same in driver code as well (- both monitor and driver are called transactors and they need access to virtual interface pointer). Inside run() task, we fork collect_txn task (POP QUIZ – Why collect_txn is a task and not a function ?). Remember fork is a way to spawn a thread/process in System Verilog.
Inside collect_txn task, a forever loop is declared that runs on every positive edge of the clock. cb.vif.clk refers to the clock inside the clocking block cb(- Clocking blocks are used to reduce potential design to Testbench race conditions.). A handle of type packet_c is created with name txn. txn is handle of type packet_c. After that, we use standard UVM create function to create an object pointed to by txn and then capture the DUT output result to abstract transaction field result. The monitor then pushes this transaction to the analysis port by calling mon_ap.write() function. And, the components (Scoreboard, Coverage Collector) that subscribed to this Analysis port will get the transaction. POP QUIZ – Where is the implementation/definition of this write function ? Hint: Look at uvm scoreboard code.
NOTE: Remember it is always the handle to the transaction which is passed with the help of Analysis port and not the object itself.
Since this section focuses on Monitors and Agents in UVM, we now need to look at the UVM Agent.
UVM Agent: An Agent “has a” Monitor, Driver and a Sequencer components. General guideline is to have one agent per interface in the design, but Verification architects are free to have no agents at all or multiple agents in the testbench based on the requirement. An agent can further be classified into two types:
- Active Agent: The agent emulates a device in the system and drives DUT signals. In this mode, all three components are instantiated – Sequencer, Driver and Monitor.
- Passive Agent: This type of agent doesn’t instantiate a driver and sequencer. Only monitor is instantiated and configured. When you don’t need to drive any traffic on interface signals of DUT, just use a passive agent. You can use it to have self-checks, assertions and coverage collection using a passive agent.
In case of passive agent, it is possible to have only Monitors and Agents in UVM can be skipped.
In below sample code of an agent class, monitor and the driver are connected using analysis port.
class add_Agent extends uvm_agent;
`uvm_component_utils(add_Agent)
add_monitor mon_i;
add_driver drv_i;
add_sequencer sqcr_i;
function new(string name, uvm_component parent=null);
super.new(name, parent);
endfunction
function build(string name = “”,uvm_component parent)
super.build(name,parent)
mon_i =add_monitor::typeid::create(“add_monitor”,this);
drv_i = add_driver::typeid::create(” add_driver”,this);
sqcr_i= add_sequencer ::typeid::create(” add_sequencer “,this);
endfunction
function connect()
super.connect();
drv_i.seq_item_port.connect(sqcr_i.seq_item_export);
endfunction
endclass
This is how a typical class for agent looks like. add_Agent class is defined by extending from standard UVM class uvm_agent. It is then registered using factory macro `uvm_component_utils. Notice all three components of an Agent – Monitor, Driver and Sequencer are instantiated. Similar to other uvm components that we look in our previous blogs, a new constructor and a build function is defined. Inside the build function, all the three components are created using typeid::create function. The three handles are named as mon_i, drv_i and sqcr_i. And finally in connect function, sequencer and the driver are connected using connect() API. Driver’s seq_item_port is connected to seq_item_export analysis port. (POP QUIZ – In passive agent, we will not be connecting sequencer and driver. Why?).
In this section, we learned UVM monitor and how a UVM Monitor snoops DUT interface pins, captures the values on the signals, converts it into abstract transactions. We also learned how an agent instantiates monitor, driver and a sequencer and connects Sequencer and the driver. This section focused on Monitors and Agents in UVM. In next section, we will see what UVM Scoreboards are for and how they are coded.
To get notifications for our upcoming blogs and tutorials, please LIKE our facebook fan page